My hubby and my daughters surprised me after I got off work last night with this beautiful Mother gift set. I love it! The candle holder is made of a pottery-like material and under the little copper lid is a hollowed out area to put a tea light in. I'm sure the fact that it has butterflies on it had no bearing on them buying it for me, at all! lol :) They know how much I adore butterflies!
The sentiment that wraps around the candle says, Mothers are like sunshine that warms the heart....a gift that is given to us right from the start.
Inside the frame, the sentiment says, Life's precious moments are shared with those closest to us.
Apparently, my girls picked this gift out for me...just because! Isn't that sweet? I love them so much...even if they were beyond cranky today! All the good times make up for those rare cranky times. They're always doing sweet little things for me, it's usually making cards for me and little gifts, but this was so nice of them to get for me. I'll treasure it for a long time. :)
Well, unfortunately, no crafty time tonight as I'm on my way to work now and I won't get home 'til 11:30 pm, but hopefully I'll get some crafty time in tomorrow. Jim leaves for sea on Monday, so I'll have lots of quiet nights to get some projects done. Stay tuned for those projects. :)
Thanks for stoppin' by! :)
Saturday, January 31, 2009
Friday, January 30, 2009
Blog Candy Alert
After a bit of blurfing, I just discovered a new crafty blog and I know I'll be returning often! She does amazing work and I'm lovin' the altered projects that I've seen! Just beautiful! :)
Kim of Crafty Makes is offering up some awesome blog candy - quite a yummy assortment of Basic Grey paper pads and delish ribbon and embellies! Go check it out, but run fast, you only have 'til tomorrow afternoon to enter! Good luck! :)
Thanks for stoppin' by! :)
Kim of Crafty Makes is offering up some awesome blog candy - quite a yummy assortment of Basic Grey paper pads and delish ribbon and embellies! Go check it out, but run fast, you only have 'til tomorrow afternoon to enter! Good luck! :)
Thanks for stoppin' by! :)
Thursday, January 29, 2009
Floral Embossed Thank You
We're having another snow day today. The roads were just too messy after our snow, then, freezing rain that we got last night, so they cancelled school for us, along with most of Nova Scotia, I believe. So, the girls and I have been passing the day away with board games, crafty cardmaking time and Drag-o-Sang Chinese tea party time. Drag-o-Sang tea, you say? What's that? Is it a new type of tea I should try? Well, no, that would just be the word of the day that my five year old daughter has made up! She says that it's tea that dragons like to drink, but it's good for us, too! Funny, eh? I thought it was cute! :)
This is the card that I made during our crafty time while trying to keep the girls out of my good supplies! I I decided to pull out my embossing gear as they're always amazed to watch the powder work it's magic, plus I don't seem to heat emboss very often, so it's high time I play with it, I guess! lol :)
Ok, gotta go get supper ready and find out if tonight's school dance is a go, or not. The kids sure are gonna be disappointed if it's cancelled, too. It's so cute to see all the little kids dancing. I kinda hope it still a go, too. :)
Thanks for stoppin' by! :)
Supplies:
Stamps: Bold Carnations - See d's (Inque Boutique), Thank You - Clear Design Messages (Hero Arts)
Cardstock: Pink Pirouette (SU), Wild Wasabi (SU), White (Staples), Lime Green (off a recycled envelop)
Ink: VersaMark
Tools: Scallop Border Punch (SU), White Embossing Powder (Stampendous), Heat Tool, Embossing Buddy (SU), Embossing Tray, Paint Brush
Wednesday, January 28, 2009
Collapsible Calendar and Burnished Glitter Valentine
Deborah and Kim designed a couple of beautiful projects for us to do last night. Deborah shared a Collapsible Calendar with us and Kim showed us a fun technique of using double sided tape over a stamped image to which we burnished in glitter to give a truly gorgeous effect. My picture just doesn't do justice to how pretty it is in real life.
Here's a close up of the beautiful sentiment and look at that gorgeous swirly sheer ribbon! So pretty! Oh, this card just shimmers! I wish I could get a better pic of it! I soooo need to take a photography class! lol :)
Here's a link to the template for this cool collapsible Calendar that Deborah did with us:
http://www.victorineoriginals.com/images/patterns/0015.pdf
This shows you how the calendar collapses to be flat so that you could slide it into an envelop to mail it. When you let go with your finger, it will pop open to become the cube shown above.
The calendar is has a top and bottom for the first six months of the year and then the last six months of the year. We chalked each of the sections first, then stamped all QuietFire Design images that corresponded to a theme for that month.
Thanks so much girls for such a wonderful night and such great projects. I had so much fun! :)
Thanks for stoppin' by! :)
Valentine Gable Box
I had so much fun last night out with the girls. They're was 9 of us there and we got all three projects done, so it was a very successful crafty night! :)
This is the project that I prepared for our crafty girls night out. :) I thought I'd make it to be used to give to a girlfriend, as apposed to our hubby's...didn't really look like a manly sort of gift to make, however I'm sure they'd appreciate the chocolate goodies inside!! lol :) I filled mine with Raspberry Bliss Hersheys chocolates, but you could put all sorts of things inside.
I scooped the heart and the 'best friends' stamps from a set of stamps that "Santa" found for my daughter Alexandria at Michaels. :) I thought they were kind of cute for Valentine's Day.
I'll show you the projects on my next post that Kim and Deborah designed for us to do. Stay tuned...
Thanks for stoppin' by! :)
Supplies:
Stamps: Ornate Flourish (Impression Obsession), Best Friends (Michaels), Heart (Michaels)
Ink: Pink Pirouette (SU), Vintage Sepia (VersaFine)
Cardstock: Pink Pirouette (SU), Cream (Staples)
Patterned Paper: Classic K McKenna (K & Company)....I used several different patterns for the main gable boxes, but they all have a pink background from this paper stack.
Tools: Oval Punch (Emagination), Double Slot Punch (SU)
Embellishments: Chocolate Brown Grosgrain Ribbon (Fabricville)
Blog Candy Alert
I was doing a bit of blurfing this morning and I came across a blog candy giveaway that I'd like to share with ya all! Pop on over to Jackie's blog to enter for your chance to win some new goodies! Check out her wonderful crafty projects while you're there! :)
Tuesday, January 27, 2009
Happy Birthday, Catherine!
This is the birthday card that I made for my friend, Catherine. Her birthday isn't until next week, but our group of stamping friends are all getting together tonight, so we're all celebrating her birthday tonight. Please pop on over to her blog and wish her a big "Happy Birthday!" and check out her crafty work while you're at it. :)
Here's a close up to show you the dimension of the butterfly. I like folding their wings a little bit, to make it look like they've just landed on the card.
Well, I'm just finishing getting ready for our girls night out of crafting. I finally got my group projects (enough for 9 of us) done earlier today. It took a lot longer to score and cut all the paper than I had expected. Kinda of a cute project, though, I think. I'll post pics later of my project and the projects or cards from the other two ladies. It should be a fun night, I', really looking forward to getting out for the night. Ok, gotta run...
Thanks for stoppin' by! :)
Supplies:
Stamps: Happy Birthday - Snag 'em Stamps (Imaginisce), Ornate Flourish and Butterfly 1 (Impression Obsession)
Cardstock: White (Staples), Navy Blue (Bazzill), Blue - a shade darker than Blue Bayou by SU (bought from Kim...don't know who makes it)
Ink: Blue Bayou (SU)
Tools: 3/16" Mini Glue Dots (SU), 1/8" Dimensional Squares (EK Success), Paper Piercer, Piercing Mat, Classic and Scalloped Circle Nestabilities (Spellbinders)
Embellishments: Navy Blue Grosgrain Ribbon (Michaels), Light Blue Satin Wired Ribbon (Fabricville), Blue Gem Brad (Dollarama)
Saturday, January 24, 2009
A New Butterfly Candy Winner!
OK, so on Monday I announced a winner of my recent Blog Anniversary giveaway and stated that she had 'til Friday to get in touch with me, as I didn't have any contact info for her. Note...if ya wanna win, ya gotta leave a place for me to get in touch with you! lol :) So, now that it's Saturday and I haven't heard from her yet, the prize is going onto another lucky winner.
This giveaway will include:
~ Garden Delight by Inkadinkado (set of 8 clear stamps)
~ Set of 6 Butterfly Note Cards by Studio18 (blank inside)
~ Butterfly Note pad by Studio18
Random Integer Generator
Here are your random numbers:
14
Timestamp: 2009-01-24 16:09:57 UTC
Congratulations, Yvonne! You're the winner! :)
Thanks for stoppin' by! :)
Friday, January 23, 2009
Happy 40th Birthday, Jim!
Happy Birthday, Jim! :)
This is a fun card that I made for my hubby, Jim, for him turning the Big 4-0 on Monday. I'll be giving it to him today since this is the day that we're having a joint celebration with all our friends, as our friend, Doug is turning 40 today, too. Our babysitter is booked and I can't wait to fly the coup for the night. I've scheduled this to post as we're on our way out the door, it should be a fun night out! :)
Wow, another masculine card...I'm on a roll, actually I'm a bit stressed to tell you the truth! lol :) I really can't wait to get back to making girlie cards...they're so much easier to design with lots of pretty embellies. I always wonder about what colours are going to be good for a masculine card. What I think would be 'manly' colours, sometimes just don't turn out looking right, or they're boring colours when put together. Well, I think this card is far from boring and has a fun design to it, so I think he'll like it. I hope... :)
Thanks for stoppin' by! :)
Supplies:
Stamps: Happy Birthday - Snag 'em Stamps (Imaginisce), Birthday Hat and Cake (Studio G)
Cardstock: Royal Blue (Bazzill), Sand Linen and White Linen (CRS), Neon Green (from a birthday invitation envelop that my daughter got!) Gotta love recyling! lol :)
Patterned Paper: Floral Gift Card
Ink: Onyx Black (VersaFine)
Tools: 1 1/4" and 1 1/2" Circle Punches (Creative Memories), 1/2" Circle Punch (Marvy)
Embellishments: Royal Blue Jumbo Brads (Dollarama)
Altered Butterfly Truffle Tin
I saw this little tin of chocolate truffles today and it found it's way into my cart. They look pretty yummy, but mostly I like the little tins to have fun altering! I chose a whimsy design of butterflies for this one. I didn't want to add any extra layers to the tin, since I didn't want them falling off. I sealed right over the stamped patterned paper, just to protect it and now it'll just wipe clean if it gets anything on it. After the truffles are gone, maybe it could be used in a purse to carry little things.
A close up of the top of the tin.
This is what the the tin looked like before I altered it.
OK, I've gotta go make supper and get ready to go out for Jim's birthday celebration. I've got another post scheduled for 7 PM tonight of the card that I made for him. Stay tuned...
Thanks for stoppin' by! :)
Supplies:
Stamps: Butterfly Garden (Storage Units, Ink and More)
Patterned Paper: Backyard "Adventure" Dragonfly/Brown - Bohemia (My Mind's Eye)
Ink: Onyx Black (VersaFine)
Tools: Corner Rounder (SU), Terrifically Tacky Tape (ProvoCraft), Mod Podge Water-Based Sealer - Matte Finish (Plaid), Foam Brush, Sponge (SU)
Embellishments: Cacao Reserve Chocolate Truffle Tin (Hershey's)...I thought I spelled it wrong at first, but, I didn't. This is what it says on the bottom of the tin. Cacao (ka-kow): A tropical tree that produces the beans from which chocolate is made.
Wednesday, January 21, 2009
Happy Big 4-0!
This is a card that I made for our friend, Doug who's turning the Big 4-0 this Friday. A bunch of us are all going out to celebrate his birthday along with for my hubby, Jim, who's also turning 40, on Monday! Happy Birthday to both of them! It should be a fun night out and we'll get to see lots of friends that we haven't seen in a while. It's terrible how time flies by and then you realize that you haven't been in touch in such a long time. But, I guess a lot of people are all in the same boat. Life gets busy and we all get into our own routines, especially after we have kids and there's that more running around to do. We all just need to make the effort to spend time with those people that we care about.
I have a lot of trouble thinking up designs for masculine themed cards. But, I remembered this patterned piece of cardstock (actually a floral arrangement card!) and knew I wanted to use the colours from it in my card. I think this made a fun birthday card, hopefully he'll like it.
I'll share Jim's birthday card after I give it to him...I don't want to spoil the surprise just in case he's peeking on my blog! lol :)
Thanks for stoppin' by! :)
Supplies:
Stamps: Birthday themed (Studio G)
Cardstock: Royal Blue (Bazzill), Wild Wasabi and Kraft (SU), Light Gray (The Paper Company)
Patterned Paper: Floral Gift Card
Ink: Onyx Black (VersaFine)
Tools: 1/2" Circle Punch (Marvy)
Embellishments: Kraft Brown Jumbo Brads (Dollarama)
Tuesday, January 20, 2009
Altered Valentine Candy Tin
This is the first of my Valentine's Day projects to show you. I made this one for my sweet hubby, Jim. I'm posting it early, so I guess it will go to him early...lol :) Otherwise he'll complain 'cause I spoiled the surprise and posted it before Valentine's Day. If you know me, you know that I have a hard time keeping a secret, especially when it comes to not sharing crafty projects! Such a silly gal, I am! lol :)
Here's a close up of the top of the tin to show you the pretty flourished stamp and patterned paper.
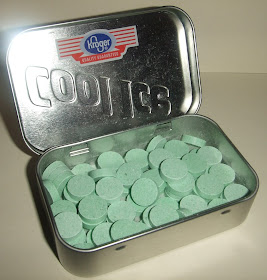
Here are the Cool Ice mints inside the tin. They're actually pretty yummy. :)
I wanted to keep this little tin simple and as masculine as I could. I didn't think Jim would appreciate me using traditional Valentine's Day colours like pink and red and white together for a project for him! So, I chose red and gray and black, beautiful colours together, yet masculine enough to use. I found this beautiful 'I Love You' stamp at Michaels a few days ago in their $1.50 bin. A great find! The Cool Ice mints came from the Dollar Store at a cool $1, so it's a very inexpensive project. I thought he could keep them in his locker on the ship and when he sees them he can think of us at home that love him. Ah, so sappy! lol :)
Thanks for stoppin' by! :)
Supplies:
Stamps: 'I Love You' (Michaels)
Cardstock: China Red Linen (CRS), Light Gray (Bazzill)
Ink: Onyx Black (VersaFine), Jet Black (StazOn) - for sponging the edges of the tin to cover up the original design
Patterned Paper: Beau Jardin Harvest (Bo Bunny)
Tools: Terrifically Tacky Tape (ProvoCraft), Scissors to trim corners, Sponge (SU)
Embellishments: 1/4" Black Grosgrain Ribbon (Michaels), Cool Ice mints by Kroger (Dollar Store)
Monday, January 19, 2009
Altered Wooden Clutch
School was cancelled today on account of the weather, so I took the opportunity to get in some crafty time and a bit of 'altering' fun this afternoon with the girls while we were stuck at home storm-stayed. Well, at least until the roads were cleared up a bit and not quite as messy. Tonight, we went out to Sparks as the roads were much better and they really wanted to go.
The girls enjoy getting together with all their little friends, I understand since I enjoy getting together with my friends, too! It's great to be around people that you have things in common with and just to laugh and carry on. Our group of stamping friends are getting together at the end of the month and there will be 9 of there. We decided to do something different this time around. Instead of us each doing our own thing, three of us are going to to bring enough make and take kits for everyone and we'll each do those projects that night. Doesn't it sound like fun? Sometimes, we all tend to just laugh and chat all night and we don't really get any crafty stuff accomplished. Which is fine, really, but it'll be nice to have that plus get 3 projects done, too! I offered to do one of them, so now I just need to decide what to do. Decisions, decisions! lol :)
This shows you it what the inside looks like and the bottom front of the clutch.
OK, I'm rambling again! I had fun altering this little wooden clutch today. I chose some more gorgeous Bo Bunny paper...oh my, I'm getting low...I must go shopping soon! lol :) I've had this little wooden clutch for a while now, I got it at the Dollarama and thought it was just too cute and knew I wanted to alter it. Finally, today was the day. To make the altering easier, I removed the front button (it was attached in behind with a screw) and the elastic tab (which knots in the back.) The tracing of the template was easier said than done, but I got it done as the girls shadowed over me in awe as the Queen Crafty Mom, as they called me, did her magic! lol :) Pretty funny, my oldest daughter kept asking me, "Mum, how do you do it? It's amazing!" I'm glad they seem so intrigued by my craftiness, but, if Jim were here, he'd just shake his head, I'm sure! lol :)
This is the view of the back of the clutch.
This is what it looked like before I altered it.
This is just to show you how the little elastic tab pulls out so you can lift the flap open.
I was going to add some embellishments to the front, but afterwards I decided that it was pretty just the way it was. I'm not quite sure what this clutch was meant to be used for, but I think it'd be cute as a little novelty purse. What's your opinion? I'd love to have some ideas!
Ok, I'm gonna call it a day.
Thanks for stoppin' by! :)
Supplies:
Patterned Paper: Beau Jardin Harvest (Bo Bunny)
Ink: Onyx Black (VersaFine)
Tools: Wooden Clutch (Dollarama), Mod Podge Matte Waterbased Sealer (Plaid), Foam Brush (Michaels)...By the way, they're on sale right now for 10/$1! Just a friendly, neighbourhood enabler alert! lol :)
and the winner is...
I nearly forgot to post a winner today for my 2 year blog anniversary giveaway! So, better late than never...the winner is Lynn! Congratulations, Lynn! I found some butterflies to share with you, to share my obsession! lol :)
This giveaway will include:
~ Garden Delight by Inkadinkado (set of 8 clear stamps)
~ Set of 6 Butterfly Note Cards by Studio18 (blank inside)
~ Butterfly Note pad by Studio18
Using Random.org the following winner was chosen...
Random Integer Generator
Here are your random numbers:
10
Timestamp: 2009-01-20 02:31:27 UTC
Lynn said...Wow it's nice to see a blogger from good old Nova Scotia! I have just started stamping and I LOVE it! I really enjoy looking at all the work that people put into their cards it certainly lets you know that they love making cards!
Congrats on 2 years of blogging!
I have an altered project to show you soon, that I made today while we were storm stayed at home. Gotta love snow days to take advantage of some crafty time! :) Stay tuned...
Thanks for stoppin' by! :)
Friday, January 16, 2009
Happy 7th Birthday, Isaac!
This card is one that I made for a special little guy for his 7th birthday. He's a huge fan of Transformers, so with the help of my awesome Hubby, we found a pic online of a Transformer and he found this space background and then downloaded a Transformer font and added the text and ta-da, we have a super cute card for a little boy. We had the most issues with my printer, for some reason, it didn't want to print out the black from the picture in the space background. Anyway, I'm happy with how it turned out and I think he'll really like it.
This is the inside of the card, showing another space background that my hubby, Jim found. Thanks, Jim! :)
We'll be heading to his birthday party tomorrow and my girls are so excited they can hardly contain themselves! They love him and his little brother and sister, they all get along really well. My oldest daughter and the birthday boy have been great friends since they attended pre-school together 3 years ago. They actually announced to everyone back then that they were engaged to be married! They're so cute together! I just don't think I'm quite ready for marriage, though! lol :)
We've had quite a cold spell here the past couple of days. Not as cold as some parts in Canada, but -25 C is too darn cold for me! Plus, it's a lot colder than that with the windchill. Not nice at all! I really hope it warms up soon. Well, it's time to call it a night and get some rest.
Thanks for stoppin' by! :)
Supplies:
Cardstock: Dark Blue (Bazzill), Flat Black (CRS), Flat White (CRS) - to print pics on
Tools: Photoshop, Epson Printer and space background pics, Tranformers pic and Transformers font
Embellishments: 18 Kt. Gold Leaf Pen (for card base and layer edges and Armour plates), Metallic Gold Gel Pen (for outlining text)
Thursday, January 15, 2009
Heartfelt Thanks meets Bo Bunny
For today's card, I used a stamp set that I'd been wanting for some time. I finally got it...eep, about 6 months ago and I finally mounted it...yesterday! Isn't it funny how we 'need' to have something and then don't even use it for a while! I had some issues with getting the outline stamp to be placed correctly over the base stamp...I was never very good at the 2-step stamping using wood mounted stamps, but I do like how this one turned out. The outline is just a bit off to the side and it's such a pretty flower. I'm so glad I finally got this set from SU.
As for the patterned paper, I broke into some more of my Bo Bunny stash. I'm soooo in love with these papers, they're absolutely gorgeous, I almost hate to cut them up! This is the paper that actually inspired me to buy a scrapbook, to get finally get into scrapbooking. My Mum has been trying to get me into it for years, but card making has always been my passion. Anyway, I still haven't started scrapbooking, but I am enjoying using this beautiful paper! Now, I need to go on another road trip and get some more of it at my cousin's store. Road trip, anyone? lol :)
Thanks for stoppin' by! :)
Supplies:
Stamps: Heartfelt Thanks (SU)
Cardstock: White Linen & Jet Black Linen (CRS)
Ink: Vintage Sepia (VersaFine), Wild Wasabi (SU), Dark Green 51 (Touch Marker - ShinHan Art International Inc.)
Patterned Paper: Beau Jardin Clover (Bo Bunny)
Tools: 1/8" Dimensional Squares (EK Success)
Embellishments: Green Bling
New Touch Markers
Thought I'd post a pic of 19 of my new friends...some new Touch markers that I bought at DeSerres with a couple of gift cards that I got from friends and family. These are awesome markers are very comparable to the Copic markers that everyone loves. The best part is that these ones were on sale for 1/2 price, ya gotta love a deal! :)
Now, I just need to practice some more with using the blender marker to watercolour with these. In my next post, I used one of the markers to apply the ink direct to the stamp to stamp with. I really need to brush up on my watercolouring, though. I've never been taught about shading and highlighting, so that'll come next. Anyone wanna offer their expertise? lol :)
OK, stay tuned for a new card creation that I had fun doing this morning...
Thanks for stoppin' by! :)
Gee, two years of blogging. You were definitely on the cutting edge of technology! Congrats on your Blogiversary. You know I like to see the projects and they are great but I also enjoy reading about just life. The little things, what the girls did, a new haircut...so I guess overall you cover everything I like. Just keep posting and then that way we all know you're okay.